Saturday, August 25, 2012

All Things Homemade: Cleaning Agents Edition

Friends, I really have no excuse for not posting in the past few weeks. I've been doing crafty things and cooking pretty much every day since my last post, but I just...I don't know what happened.  It was partly laziness, partly writers block and partly having no patience for the slowest Internet south of the Mason Dixon Line!

No. Seriously.

I've told you all before, but I'll make sure you understand...WE LIVE IN THE MIDDLE OF NO WHERE! Take for example the fact that I attempted to make this recipe for Black Bean Salad (original recipe) the other day and guess what? The local grocery store didn't have AVOCADOS! Seriously?! Yes. Seriously.

I can't make this stuff up people. 

However, you should know that the recipe was still SO DELICIOUS! I went to have lunch with the hubby and the other teachers on his team and brought some in with me, the salsa (which is what I call it because, well it tastes more like a salsa than a black bean salad) got RAVE reviews! :) 

Anyway, so today I'm going to share with you quite a few things, because I have pictures of them and I figure I might as well make up for time lost.

The first is an All Purpose Orange/Lemon Cleaner
You literally need Orange and or Lemon Peels, White Vinegar and a Quart-Sized Mason Jar. Combine everything in the mason jar, allow to sit for 7-10 days and it's good to go! :)  The vinegar is scented by the peels and the cleaner leaves the house clean and shiny. 


Because I started making and using my own homemade laundry soap (which I LOVE), I also decided to use this recipe from www.thefrugalgirls.com to make my own fabric softener.  They have TONS of other really cool stuff. Don't go unless you have lots of time to get sucked into their site! Anyway, here's how you do it.
You'll need white vinegar, conditioner, and boiling water
Add your conditioner to a large bowl.

Carefully add the boiling water

Then add the vinegar.  Stir everything together and make sure there are no clumps of conditioner in the bowl.  Let it cool and put into a container for storage.
 
I add about 1/4 a cup to my laundry sometimes even 1/2 a cup.  The original recipe calls for significantly less, but I found that it really doesn't work unless you use more.  However, it is SUPER cheap to make so it doesn't bother me to use a little more.
 
The last thing I have for you is a homemade dishwasher detergent. Honestly, my vote is out on this one.  It does the job and I'm positive there are all sorts of benefits to making your own as far as knowing the chemicals that are going into your dishwasher, which you can read about here, but I don't know about the price comparisons. Also, my glasses are becoming cloudy the longer I use the homemade dish detergent. Nevertheless, here's how you do it.
 
You're going to need:

Borax
Washing Soda
Salt
NO SUGAR ADDED Lemonade Packets (not pictured)


Add all of your ingredients into a bowl and mix well.

Then add to an empty container! (I knew there was a reason my Mom saved this for me!)
You add about 2 TBS per load and 3 DROPS of dawn dish soap. If you do anymore than 3 drops you'll have a foam party in your kitchen. (Just trust me on this one!)
 
 
Phew! Hopefully that will make up for the weeks without one single post. :) Hope you enjoyed!


Tuesday, August 7, 2012

Homemade Mod Podge & Tile Coasters

Today is a two-in-one post. (I seem to be doing a lot of those lately.)  Anyhow, this one has to be a two-in-one, because in order to complete one crafty thing I had to first create another.

What I initially set out to do today was to make coasters from the SUPER cheap tile that I found at the local thrift store a few months ago; however, I soon realized that in order to make the coasters I needed mod podge. (which of course…I DIDN’T HAVE!... Go figure.)

I remember seeing things all over the internet about making your own mod podge—you can read about it here, or here, or here.  There is also a debate about whether or not the homemade stuff is as good as the real stuff and to be fair you can read about whether or not it’s as good as the real stuff here.   
PHEW! I’m glad I got all of those references out of the way. Can you tell I spent a couple hours researching whether or not to make mod podge? Honestly, I was impatient and I wanted to make mod podge no matter if my project would be yellowed in 5 years. (Which is a possible side effect of using homemade mod podge, so don’t use on really nice pictures if you’re worried about them.) You can read about that here.
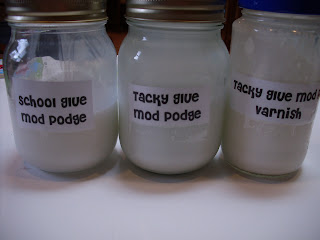
When I set out to make mod podge, I had two options: Tacky Glue & CraZart Glue (the off OFF brand of glue).  Well, if you read the original recipes you will see that Elmer’s Glue is the saint of all glues and is to be the ONLY one used, but as I’ve mentioned SEVERAL times…I do things my way.  So, hang on because all of this is going to make life easier for you.  It turns out tacky glue works (if that’s what you have on hand) and so does the cheap off OFF brand stuff. So, go ahead, knock yourself out! Be a rebel and use something other than Elmer’s. (Unless, of course, that’s what you have on hand.)
I made 3 different recipes of mod podge. One using CraZart glue and water, one using tacky glue and water and the last using tacky glue, water and Varnish

Tacky Mod Podge:
1 Cup Tacky Glue
1 Cup Water
2TBS Varnish (add for better waterproofing qualities …optional)

Off OFF Brand Mod Podge:
1 bottle school Glue (brand clearly doesn't matter)
1 bottle water (refill the glue bottle to ensure a 1:1 ratio)

Shake well to make a thin paste.

Add polyurethane for extra waterproofing if desired.


 After that was finished, I cleaned off my tiles and got to work.  I decided what I wanted most were some THEMED coasters! J Yay!! I know it’s early for Christmas, but I had Christmas paper.  I made a set of Christmas coasters and a set of Fall coasters.  I used all 3 concoctions of mod podge and to be honest…they all seemed to work about the same.  I will say this much—I learned that LESS IS MORE in this project. If you slather too much glue on your project the paper gets too soggy and starts to bubble. BAD!  In any case here are some pictures to document the experience.  

You'll need:
Tile
Scrapbook paper
Mod Podge.(Homemade or Not)

Place your scrapbook paper over your tile and cut around the square.  Then add a THIN layer of glue to the top part of the tile, place the scrapbook paper over the glue and smooth everything well. Make sure there are no air bubbles or wrinkles. Add another THIN layer of glue over the scrapbook paper and allow to dry. You can spray a clear coat over the coasters to keep them more water proof.


This picture shows the differences in the glues and how they look wet.
This is after about 20 minutes of dry-time. You can see the air bubbles in the one on the right. Again..LESS IS MORE!


And there they are in all their glory! :) Both projects are pretty easy.  Nothing like a nice dose of instant gratification!


Monday, August 6, 2012

I Do Math & Give You A Recipe For Laundry Detergent

So, I've wanted to try this new fad—you know the one—the one where you make your own laundry soap, dish washer detergent, fabric softener etc. Well, I have to admit, when it comes to things like this my feelings are pretty consistent: when you go to the grocery store and buy the stuff that is already made, you’re paying for CONVENIENCE!!
And, I quite enjoy my convenience.  Thus, if the recipes for laundry soap or anything else called for grating soap, boiling it all together, pouring it several times, watching it cool for hours just to add more crap…I WOULD NEVER DO IT! No one has time for that, and if they do have that kind of time, they either have children to tend to, or spend their free time on pinterest which leaves no time for grating soap. Just sayin’.
That’s why I HAVE to share with you this recipe for homemade laundry soap, friends, honestly I wouldn’t lie to you.  This recipe is beyond easy, quick and there is no grating-soap-hard-work-slaving-over-the-hot-hot-stove-crap involved.

Also, I am going to break down the SERIOUS cheapness of this homemade laundry soap. I BLEW myself away realizing how much money I am going to save doing this.  The initial cost is more than what it would be to buy the laundry soap outright; however, the savings on the soap pays for all the ingredients involved. You’re going to pass out when you read this!


Ingredients
3TBS Borax
3TBS Washing Soda
2TBS Dish Soap


*PLEASE READ THE RECIPE I MADE A MISTAKE IN THIS PICTURE*

 
This is what you're going to need. MINUS the baking soda (SORRY!! I didn't want to retake the picture!!)
Start by adding 3TBSBorax & 3TBSWashing Soda to something that is either gallon-sized, has measuring lines(like my trusty bucket.)
Next add in 2TBS of dish soap


Add 4 cups boiling water to the mixture, let it all dissolve and allow it to cool.  Then finish adding COLD water to make a complete gallon.


After you've added enough water put the mixture in a container and there you go!

Add about 1/2 to 1 cup of detergent to your laundry depending on load size.

THE MATH

Now, I broke down everything that I bought for the recipe.  First I had to take the amount that I bought and convert that into TBS and HOLY-BAD-AT-MATH-BATMAN that took me a good few minutes.
I will say this much, thank you to my 6th grade math teacher for teaching my proportions, because at this website I found out that there are 32 TBS in 16oz, which then allowed me to set up a simple proportion to figure out the amount of TBS in say 55oz. (*YAY ME!*)

After that I figured out what the cost per TBS was in order to determine the cost per recipe. So add up all of the cost per recipes AND WHAT DO YOU GET?! 23 FREAKIN’ CENTS PER RECIPE!! 23!!  WOAH!  

Here’s the math-
Washing Soda- 110 TBS….$3.24 (.03x3TBS)  ((9 cents per recipe))
Borax- 152 TBS……$3.38  (.02x3TBS)       ((6 cents per recipe))
Dish Soap-48 TBS….$1.97 (.04x2TBS)     ((8 cents per recipe))
                                                                    23 cents per recipe!!
Ok, now just for kicks and giggles, let’s figure out how many loads of laundry you can do with one recipe.  Each Recipe Makes 1 Gallon of Soap and you use 1 cup of detergent per load.
16 cups in a gallon= 16 Loads of laundry for 23 cents!!! (Yay for easy math.)
Compare that to laundry soap at the grocery store—My husband bought a bottle of OFF BRAND (the cheapest off brand, because TRUST me that man can spend 15 minutes looking at the same isle of stuff crunching numbers to make sure we buy the cheapest thing we can!) laundry soap at the DOLLAR STORE (for goodness sakes) and if the dollar store can’t beat the price of the homemade soap, no one can. 

The price of that bottle was $2.75 for 33 loads, which means you can do 16 loads of laundry for $1.28. 

Alright, let’s sum this all up and STOP DOING MATH FOR THE LOVE OF ALL THINGS HOLY!
Homemade Laundry Soap
Store-Bought Laundry Soap
$.23 cents for 16 loads
$1.28 for 16 loads

SAVINGS: $1.05 per 16 loads.


I apologize for the weird numbers (16 loads) but think about it this way: If you have a family it is EASY for you to do 16 loads of laundry a week. That is a savings of $1.05 a week, which is HUGE. J 
Ok, my brain hurts. I’ve seriously got to stop thinking about numbers.  In the mean time, enjoy your CHEAP laundry soap and perhaps collect the extra money you’re going to save using this soap, make a pile of it and ROLL in all your savings like a pile of freshly raked fall leaves.

Thanks for reading another post! J

Sunday, August 5, 2012

Chicken Parmesan Recipe & Etsy Sneek Peek

Because I've felt like complete CRAP since yesterday. (That is why there was no post yesterday.) I'm going to share with you a recipe that I made earlier this week when the family was down. All the pictures are taken and it's ready to be posted, which creates a lot less work for me. (I knew there was a reason I had some "back-posts" ready.)   


Chicken Parmesan

Chicken (3 large breasts that you halve to make 6 pieces)
2 cups Flour
2 cups Italian Bread Crumbs
¼ cup Parmesan Cheese
3 Eggs
Mozzarella Cheese
1tsp Garlic powder
salt & pepper
Spaghetti Noodles (or your choice of your favorite pasta)
1 jar of your favorite pasta sauce
Recipe serves 6.
First thing, First-
The chicken breasts I had were VERY thick, so I butterfly cut (cutting "hot dog" style to make thinner pieces) them to make 6 regular sized pieces rather than 3 GIANT sized pieces.  If you have chicken you are satisfied with, skip this step.

Next, you're going to get your "breading station" ready.  First in the breading station is 2 cups flour mixed with 1 tsp garlic powder and your desired amount of salt and pepper. Also, during this step grab a second bowl and mix together 1/4 cup parmesan cheese and 2 cups bread crumbs.

Here is a picture of your complete "breading station" 3 eggs mixed thoroughly, bread crumbs & parm, and the flour mixture mentioned above. First place the chicken into the flour mixture and coat well. *Then give it a nice egg bath followed by a roll in the bread crumbs. Make sure the chicken is completely and evenly coated.  If you want your chicken extra crispy (I did.) repeat from * one more time.

Here is what your chicken will look like when it's finished at the breading station. You want to set your oven at 350 and cook for about 10 minutes per side. (about 20 minutes total) While your chicken is cooking, boil your water, cook your pasta according to the package instructions and warm your pasta sauce. (I didn't take pictures of that, because I figured you could handle that part.)
After it has cooked thoroughly, remove chicken from the oven and SMOTHER in mozerella cheese.  Return it to the oven long enough for the cheese to melt. By the time your cheese is done melting, your pasta should be finished and your pasta sauce should be nice and hot! 

Drain your pasta, put some on a plate, put the chicken on top and cover in pasta sauce! YUMMY!! :)


Here is a sneek peek of what I've been working on for my etsy shop! (HandKraftedCreations)

Bronze, Silver, Gold plated Elephant Charm Bracelets


   European Murano Bead Charm Bracelets


Friday, August 3, 2012

Crochet Hooks & Bittersweet Goodbyes

Tonight is the last night with the family as they will be traveling back to Ohio tomorrow morning.  It's been quite the week, from puppy turds to beardless beach trips, we've had one heck of a good time! 

I'm ready to have the space all to myself again, especially since hubby goes back to work in a week,(BUMMER!) but like I said before, I am REALLY going to miss my family. Anyway, on to the crafting I've been doing today. 

As I mentioned before, my sister brought her little yappy thing with her when she came to visit.  Here let me show you:
Don't let that sweet little face trick you! Her name is Katniss (aka Nissy) and the name fits her perfectly. She's a fiesty, never-quit-running, mouthy little thing!! But, before she left I had to get crafty and send her home with some adorable clothes!


Using this tutorial (this person does a really good job of explaining how to make the sweaters, so rather than redoing it and putting it here, I figured it would be best for you to use her site.) I made her 3 different sweaters and then my sister requested I make her a bikini.  I fondly called it: The Dogkinni! This pattern I made up on my own, but if you're interested in crocheting a dogkini I will eventually put up a tutorial. 


For those who have an interest in making crocheted flowers (similar to the one pictured above) here is the pattern!

Crochet Flower:
Key--Ch=Chain, sc=single crochet, sl st= slip stich, hdc= half double crochet

Ch 4, sl st to join

Rnd 1- Ch 2, 9 sc in loop, sl st into 2nd ch in Ch2
Rnd 2- *Ch 2, dc in next st & hdc in same st, sl st in next st
Rnd 3- Repeat * until end then sl st between the two petals. Cut and weave ends

Thursday, August 2, 2012

Beardless At The Beach


Beardless At The Beach; I'm pretty sure the title explains it all.  Today, the group took a road trip to VA Beach.  Needless to say, it was sunny, warm and delightful!  Well, except the part where I swallowed half the ocean and spent about 15 minutes hacking and being disgusting to try and get the EXTREME burning sensation out of the back of my throat.  (There should be discretionary warnings near the beach. "CAUTION WHEN SWALLOWED THE OCEAN INFLICTS EXTREME PAIN TO NASAL PASSAGES AND ESOPHAGUS!"  Perhaps they should even pass out nose plugs and goggles.)

So today’s post will be fairly short.  I’ll show you a few pictures of us at the beach (Raymond Beardless at the Beach) and include a home remedy for swimmer’s ear that I found here.  I figured that would be appropriate. My favorite remedy is this one:
"Very simple solution that my daughters EN&T specialists told me. Rubbing alcohol & white vinegar. Mix equal parts (1 table spoon to 1 table spoon) use either a dropper or cotton ball (to suck up the mixture) place 2-3 drops in each ear in the a.m & repeat at nite. IF swimming, ONLY use the drops AFTER swimming for the day. Continue for a week. IF situation does not get any better seek medical attention asap!! Good Luck Everyone!!"
Another writer also said to WARM the solution to body temperature before putting it in your ears to decrease the risk of dizziness.  There are several other remedies on the website, so feel free to venture to the site and check it out for yourself! :)
Taking a break to eat some lunch! If you've never seen one of these "half tents", I highly recommend them! They are HEAVENLY! :)  It creates a nice little cubby to have lunch free of the sunshine and without having to sit in the sand.

Baby sister chillin' in the half tent! :) Look at those beautiful baby blues!

Me and my baby-faced sweetheart! <3

Yay for brothers! :) 


Soon, our family will head back to Ohio and it’s a bittersweet feeling.  I won't miss the small dog that has wrecked HAVOC in the house for the past week; I won't miss the amount of dirty dishes that accumulates from 5 people eating 3 meals a day in the house; and I'm definitely not going to miss sharing our ONE television with everyone! However, I am going to miss the EVER-LOVING-CRAP out of my family! It's difficult being far away and it's going to be difficult to say goodbye.
Until Next Time My Good Friends! :) 

Wednesday, August 1, 2012

The Infamous, Long Awaited, Beard Shaving Party

Today has been quite the busy day. Not only did I have a meeting with my new advisor at Old Dominion University, which brought good and BAD news,  (-sigh- no one ever said this life thing was going to be easy.) I took a ride on a boat with the family AND I have been preparing for Hubby’s BEARD SHAVING PARTY!!
Yes, Ladies and Gentlemen, you heard that correctly—His Beard Shaving Party.  My husband has had a full grown beard since the ripe old age of 14!...That’s FOUR-TEEN!!...1 (DASH) 4!! That means he has had this beard almost half as long as he’s been alive. WOAH! The only time I’ve ever seen him without his beard is in his senior pictures.  J  Life is about to get REAAALLL interesting! 

This is a milestone; a milestone in our marriage, and our lives in general. So, I thought what better way to document this milestone than to BLOG ABOUT IT! We are going to have pictures to document EVERY part of this.  We have baked and decorated cookies with faces in various stages of beard shaving, which I am going to include pictures of incase you have the sudden urge to make beard cookies yourself!

Really, this is like a three for one—a sugar cookie decorating tutorial, a little sneak peek into our evening boat ride AND the milestone of our lives.  Seriously…this milestone may be bigger than the day we bought our car! So, get ready, because for those of you who know my husband, this is going to be AWESOME for you!

Hold on tight, because HERE WE GOOOO!!!
First, the cookies! (What?! I have to shave the best for last...I mean SAVE the best for last.)

Add the amount of icing you want into a sandwich bag.

Cut a LITTLE bit of the corner off, and squeeze the icing to the tip.

Put a line of icing all the way around the outter edge of the cookie. This will ensure the rest of your icing stays on the cookie.
Melt a color that you want as the background and dribble a little on to the cookie. Use the fork to spread it evenly.


 Now, decorate! Some of the cookies we used cinnamon as the beards.  The rest of the beards were made with chocolate icing. :)


 Yay for Beard Shaving Parties!!


Double Yay for Boat Rides!! :)


And Now...What you've all been waiting for!!


                            Before                                                After (Who is that smokin' hot man?!)


Until next time friends.