What I initially set out to do today was to make coasters from the SUPER cheap tile that I found at the local thrift store a few months ago; however, I soon realized that in order to make the coasters I needed mod podge. (which of course…I DIDN’T HAVE!... Go figure.)
I remember seeing things all over the internet about making
your own mod podge—you can read about it here, or here, or here. There is also a debate about whether or not
the homemade stuff is as good as the real stuff and to be fair you can read
about whether or not it’s as good as the real stuff here.
PHEW! I’m glad I
got all of those references out of the way. Can you tell I spent a couple hours
researching whether or not to make mod podge? Honestly, I was impatient and I
wanted to make mod podge no matter if my project would be yellowed in 5 years.
(Which is a possible side effect of using homemade mod podge, so don’t use
on really nice pictures if you’re worried about them.) You can read about that here.
When I set out to make mod podge, I had two options: Tacky
Glue & CraZart Glue (the off OFF brand of glue). Well, if you
read the original recipes you will see that Elmer’s Glue is the saint of all glues and is to be the ONLY
one used, but as I’ve mentioned SEVERAL times…I do things my way. So, hang on because all of this is going to
make life easier for you. It turns out
tacky glue works (if that’s what you have on hand) and so does the cheap off OFF brand stuff. So, go ahead, knock yourself out! Be a rebel and use something other
than Elmer’s. (Unless, of course, that’s what you have on hand.)
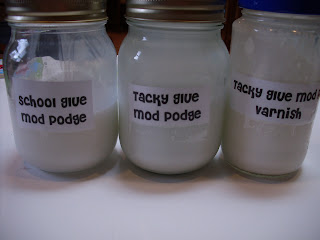
I made 3 different recipes of mod podge. One using CraZart glue and water, one using tacky glue and water and the last using tacky glue,
water and Varnish
Tacky Mod Podge:
1 Cup Tacky Glue
1 Cup Water
2TBS Varnish (add for better waterproofing qualities …optional)
1 Cup Tacky Glue
1 Cup Water
2TBS Varnish (add for better waterproofing qualities …optional)
Off OFF Brand Mod Podge:
1 bottle school Glue (brand clearly doesn't matter)
1 bottle water (refill the glue bottle to ensure a 1:1 ratio)
1 bottle school Glue (brand clearly doesn't matter)
1 bottle water (refill the glue bottle to ensure a 1:1 ratio)
 |
| Shake well to make a thin paste. |
 |
| Add polyurethane for extra waterproofing if desired. |

You'll need:
Tile
Scrapbook paper
Mod Podge.(Homemade or Not)
 |
| This picture shows the differences in the glues and how they look wet. |
 |
| This is after about 20 minutes of dry-time. You can see the air bubbles in the one on the right. Again..LESS IS MORE! |
And there they are in all their glory! :) Both projects are pretty easy. Nothing like a nice dose of instant gratification!


another one I've been itching to do FOREVER!! so glad your turned out great! I love the idea of themed coasters... Thanks!
ReplyDeleteHi. Great recipes for tacky glue.
ReplyDeleteIt's really hard to read though, with the polka dot background and small red text.
Can you Recommend a Good Printer for Decoupage? Any Suggestions would be Appreciated, Thank you
ReplyDelete